Images are a critical part of your website/blog. Infographic is really a great technique of attracting more people towards your website. Pinterest, Instagram, Facebook, Twitter allow you to use images. It is highly recommended to use at least one image to every article you write.
It’s a simple recommendation: use images (featured image, screenshots, Infographic) to every article you write online. It’ll make it more appealing.
There is a simple image SEO reason for that: an image that is surrounded by related text, ranks better for the keyword it is optimized for. More details on image SEO later. Yoast Image SEO
When a visitor goes to your site, it can take a while depending on how large your webpage is. Specifically with images, the larger the file size the longer it takes a webpage to load.
Never upload large images, it can make your website too slow and visitor will immediately leave your website. Amazon found that if their pages slow down by 1 second, they lose $1.6 billion a year.
How to Optimize Your Images
There are many free and premium WordPress Image Optimization Plugins available. You can install free version to optimize your images.
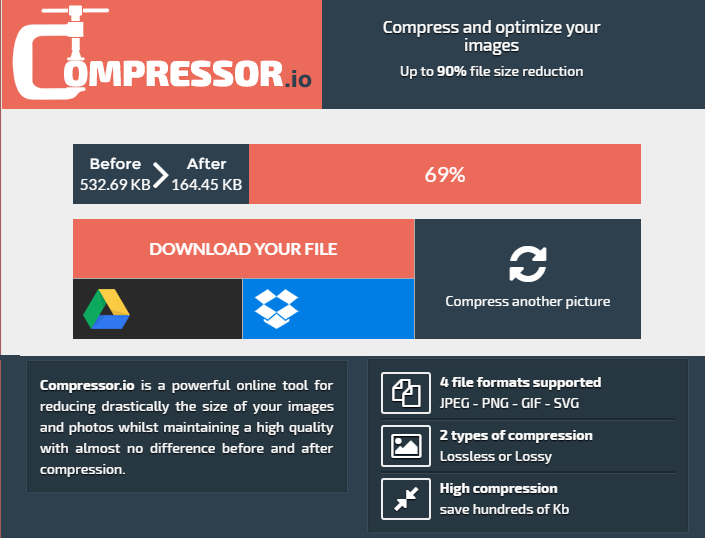
If you don’t want to install a plugin, you can use online free image optimization service like compressor.io.
Optimus – WordPress Image Optimizer Plugin Review
Optimus is a free WordPress image optimization plugin from KEYCDN team. Go to Plugins > Add New and search for Optimus and install this free image optimization plugin.
Optimus image optimization plugin can reduce the file size of uploaded media files. Depending on the image and format (jpg, png), reductions in size of up to 70% are possible.
With image compression several kilobytes can be saved per image—these savings contribute positively to the performance/speed of the website. As a result, optimizing images can often yield some of the largest byte savings and performance improvements for your website.
Optimus Settings
To view all Optimus plugin setting go to Settings > Optimus. Here you can see the screenshot of Optimus Settings page.

Image Size Settings
Optimus (1.3.2 or higher) shows a list of registered image sizes that are created by WordPress. In my case thumbnail, medium, medium_large, large, post-thumbnail, guest-author-32, guest-author-64, guest-author-96, guest-author-128 are registered image sizes.
Don’t Compress original images
If you don’t want to compress/optimize your original images, select the No optimization of original images option.
When No optimization of original images option is activated, Optimus will only compress preview images (thumbnails) and always skip original images.
Image Meta Data Settings
In its default settings, the Optimus plugin will remove all meta information from the image in order to ensure the most efficient image optimization possible.
The option “No deletion of image metadata” will turn off the data cleaning to keeps all the metadata stored in the image.
NOTE: Only Optimus HQ ($29/year) Active option keeps EXIF-, copyright and photo creation information in images.
Creation of WebP files
WebP is an image format developed by Google in 2010. The format allows users to save an image in either lossy or lossless format. Google has made bold claims about the compression efficiency of the format stating that it can be up to 34% smaller than the equivalent JPEG or PNG file. Source Zamzar
WebP image files are considerably smaller, which is a clear advantage for website performance but Optimus Free version does not allow you to create WebP files. You will have to purchase Optimus HQ ($29/year).
HTTPS connection : Transfer images using TLS encryption
The free version of Optimus image optimization plugin does not allow you to use HTPS connection feature. You will have to buy Optimus HQ ($29/year).
If Transfer images using TLS encryption option is active, communication with the Optimus server is conducted through an HTTPS connection. Which slightly slows down the Image optimization process.
Optimize during upload No optimization of images during the upload process
This feature will prevent the automatic image optimization during the upload process and you will have to optimize images manually via the Media Library later on.
Optimize All Images Feature
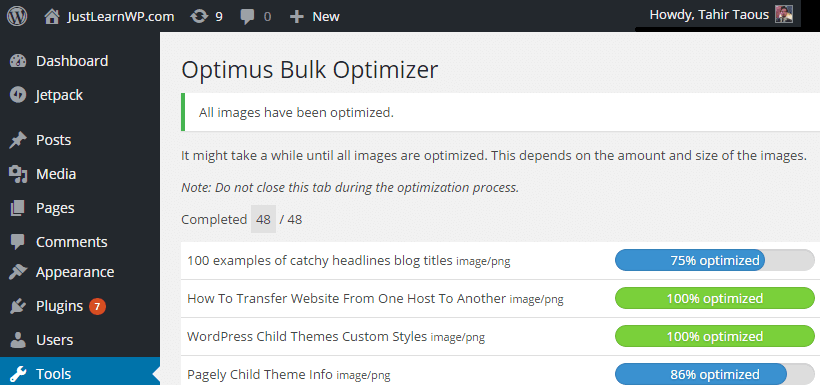
After activating Optimus plugin, you can optimize all your images with Optimus Bulk Optimizer option. Go to Tools > Optimize All Images. To optimize all images you can click on Optimize All Images button.
Optimus found 48 images in your WordPress media library and it took about 5 minutes. But not all of my images were optimized due to the size limitation (only 100KB) of the free version.
Optimus does not display the size of optimized images (before and after optimization).

Optimus HQ Test
*The Optimus bulk optimizer compresses all images that have not yet been compressed in your WordPress media library.
It is recommended to run the bulk image optimization with an Optimus HQ ($29/year) activated version due to the size limitation of the free version.*
I have also received Optimus HQ key, after adding key, I uploaded 3 new images but Optimus HQ failed to optimize any image. There wasn’t any difference between image size.
I also tried to use Optimus Bulk Optimizer but Optimus failed to optimize 2 new images (1.07MB and 235KB JPEGs). Optimus compressed the 3rd image but there wasn’t a big difference in file size (before 810 kB. after 654 kB).
Then, I used online image optimization service compressor.io to compress third image and result was amazing. 81% file size reduction means the final size of the optimized image (810KB) was 158KB.
Should you use Optimus Plugin
To be honest, this plugin has a free version but I don’ think the free version is worth installing. You should only use this plugin if your images are less than 100KB. Image meta-data, WebP files creation and HTTPS connection are Optimus HQ ($29/year) features.
Normal images, screenshot and other blog images are always more than 100KB. I took screenshots of few websites (visible part only). See the size of uncompressed screenshots.
- Google Home Page – 41.9KB
- Google Search Page – 115KB
- WordPress home page – 153KB
It means, free verion of Optimus plugin won’t compress your screenshots and other blog images (more than 100KB). It’s up to you, use another image optimization plugin, online service or pay for pro verions.
There are many other free WordPress plugins such as WP Smush available which allow you to compress all standard web-sized images 1MB or smaller.
Imagify is another free image optimization plugin for WordPress and you can optimize for free 25MB of images (about 250 images) every month.
Optimus Pricing
The Free version is also available but if you really want to use this plugin you will have to purchase Optimus HQ ($29/year) and Optimus HQ PRO ($149/year) to optimize images compress PNG or JPG images 5MB or smaller.
Which Image Optimization Plugin You Should Use?
I don’t recommend any WordPrss image optimization plugin unless you have a lot of large images on your blog slowing down your blog and you need to optimize them. Because it is not easy to optimize hundreds of images manually.
If you are going to use 2 or 3 images in every blog post, always use online image optimization service such as compressor.io which allows you to optimize all standard images (JPEG – PNG – GIF and SVG) 10MB or smaller.

I have been using compress.io for last few months and it is one of the best online image compression service.
Final Words
This is my honest review of Optimus WordPress Plugin. I used my local development server to install and test this plugin. WAMP Server 3 and WordPress 4.4 on Windows 8.
If you are using this plugin, share your views and add your comments below.