In this post, you will learn how to create child theme in WordPress step by step, All the basics of WordPress Child Themes.
You will learn how to import Parent Theme CSS styles, how to override Parent Theme styles, and why you should create WordPress child themes.
To learn why WordPress child themes are important you should read our WordPress Parent And Child Theme Development Beginner Guide
What you can do with WordPress child themes?
With WordPress child themes, You can very easily customize your default active WordPress theme. You don’t need to know advanced HTML, CSS, PHP or JavaScript to create child themes.
Basic or good understanding of HTML, CSS, and PHP could be very helpful.
Further Reading: How To Choose A Perfect Free Or Premium WordPress Theme
You can use a WordPress child theme to modify your site with CSS, add new widget areas, additional navigation menus, edit custom files to create new pages with custom styling.
With child themes, You can also reorder site elements, add new content/elements and Change any functionality.
Why You Should Create a WordPress Child Theme
The reason child themes exist is so you can customize a “parent” (your existing/active) theme without losing your changes and modifications when you update the parent theme.
For example, if you have directly modified the single.php file, your customizations would work fine at first.
However, when you will update your theme to a newer version of your modified theme, You will lose all of your changes and there will be no way to restore your customization.
What you need
You can create a child theme quickly and upload it to your server, but it is recommended to install WordPress locally on your PC.
With local WordPress installation, You can quickly create and test your theme, You don’t need an internet connection all the time.
With local WordPress site, You can make mistakes without affecting your live site and it is much faster and better way.
There are many ways to install WordPress locally on Windows, MAC or Linux. Read this tutorial, to learn how to install WordPress on local PC with Bitnami WordPress stack.
We have already published step by step tutorial for beginners.
How To Install WordPress On WAMP Server In Windows 8
How To Install WordPress On Windows 8 Using Bitnami Stack
how to create child theme in WordPress step by step guide?
For every child theme in WordPress, two files are required.
- functions.php
- style.css
In style.css file, we can add information about our child theme, e.g theme name, theme description, author name, parent theme details, tags etc.
We also need a functions.php file to register parent and child theme style sheet. With functions.php file we can also add new functions, register new navigation menus, widget areas etc.
So let’s start creating your first child theme. In this child theme, we are not going to add new widget areas, navigation menus etc. We will use our child theme to make some simple CSS changes, We will override default CSS styles.
You can use any WordPress theme as a parent theme, for this tutorial, I am going to create a child theme for TwentySixteen theme.
Create a new folder and save it as twentysixteen-child or you can name it anything you want e.g design.
Create two new files and save them as functions.php and style.css file in our child theme folder. My child theme folder name is designbomb.
Now add the following information in your child theme’s style.css file and save your file.
/*
Theme Name: Design Child
Description: A simple child theme for design blog.
Author: Tahir Taous
Version: 0.1
Template: twentysixteen
*/
Now log in to your WordPress dashboard. Go to Appearance > Themes > Add New and upload this new child theme. You will see a new theme without any screenshot. Hover your mouse on the theme and click Theme Details button.
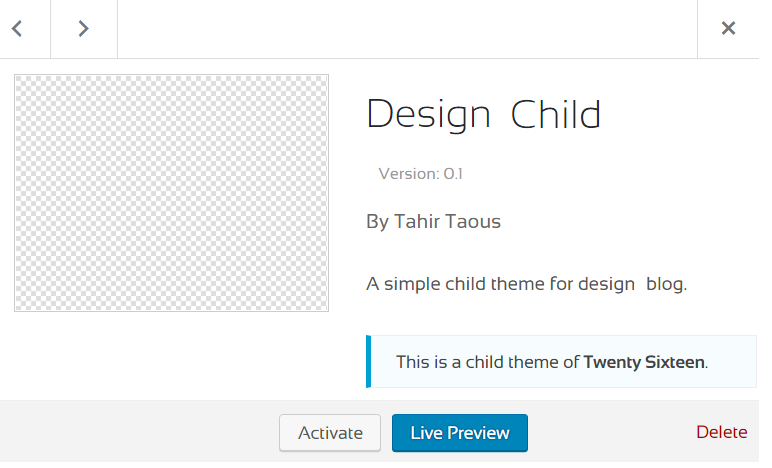
You will see following details for your new child theme.

In above screenshot, You can see all basic information about our child theme. Name of our child theme, who is the Author of this theme, description of child theme and you can also see This is a child theme of Twenty Sixteen.
message.
We have added Template: twentysixteen in our child theme’s style.css file. This line is telling WordPress that twenty sixteen is the parent theme.
If you are using any other theme, replace TwentySixteen with your parent theme name.
Now activate your new child theme and reload your front page. You should see all the content without any styling. Don’t worry, that’s normal. This is because we have not included our parent and child theme’s style.css file
After activating new child theme Go to Appearance > Editor and select functions.php (Theme Functions) file, add the following code in functions.php file and click Update file button to save your changes.
<?php
function theme_enqueue_styles() {
    $parent_style = 'parent-style';
    wp_enqueue_style( $parent_style, get_template_directory_uri() . '/style.css' );
    wp_enqueue_style( 'child-style',
        get_stylesheet_directory_uri() . '/style.css',
        array( $parent_style )
    );
}
add_action( 'wp_enqueue_scripts', 'theme_enqueue_styles' );
Now visit front end of your WordPress site and reload your page, You should see the normal site with all the TwentySixteen styles.
Modifying existing styles
It means our child theme is ready, It is time to customize our parent theme with new CSS styles. Now under Appearance > Editor select style.css file. We are going to add some new styles.
Add the following style in your child theme’s style.css file and save your file.
.main-navigation .current-menu-item > a, .main-navigation .current-menu-ancestor > a {
    font-weight: 700;
    background: beige;
    border-radius: 5px;
    color: #D2691E;
    box-shadow: 2px 1px 8px #815317;
}
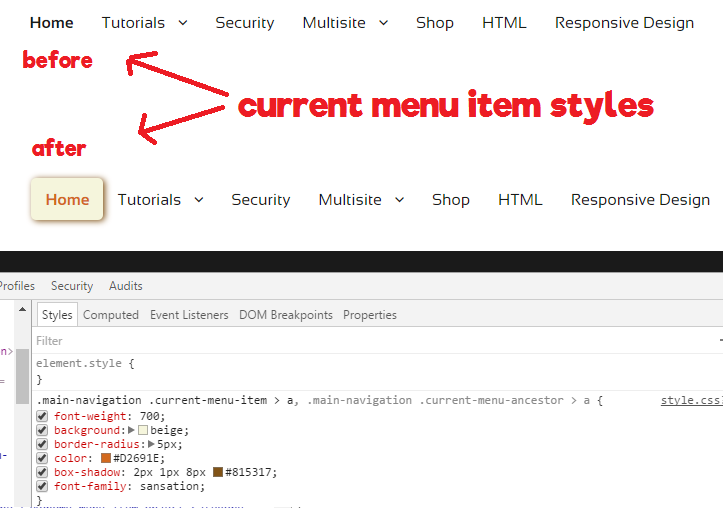
reload front end of your site and open any page. We have modified default styles for the current menu item. See screenshot below.

For the current menu item, I have added a new background color, border-radius, color and box shadow. It was very simple and easy to change styles with Chrome Dev tools.
That’s all
Now you know how to create child theme. Wasn’t that simple and easy. With WordPress child themes, you can customize almost every file of your parent theme but it is not recommended to modify every file of your parent theme.
Always use child themes to add necessary functions, features or custom pages.
Thanks for this helpful tutorial.
I have been needing this for so long!! You have explained it very well, but I know how important using child themes is. Thanks!!
I know that the previous method was to import the parent theme stylesheet using @import and this is no longer best practice. Now it is recommended to use wp-functions.php file
Why are all custom themes to be build on the WordPress default themes. There are now plenty of themes that can be purchases that are flexible enough to be converted from any PSD design.
You can create a theme from scratch if you want but if you want to customize a section of your website then you should create a child theme.
Great and informative tutorial.
Thanks for sharing.